As everyone who knows me in real life knows (because I won't shut up about it!), I'm currently working on my M.A thesis. And as many who know me in real life also know, I'm working on a graphic prologue and epilogue to it.
In the past, I've done comics the old-fashioned way-- pencil, paper, felt-tip pen, correction fluid, and a whole lot of erasers. For short, one or two page graphic essays, this is probably quicker. Anything longer, though, and it becomes quite labor-intensive. Further, the paper-and pen method has very little room for error-- too much correction fluid and it's obvious, too much erasing and you risk tearing the paper, etc. And because I do everything that you're not supposed to do when I draw, I need to work with a medium that lets me screw up several times until I find the line I like. Finally, paper and pen scanned in just doesn't look as professional. There are eraser marks, smudges, built-up bits of white-out, etc.
So, bearing all this in mind, this summer I invested in a Wacom Cintiq 12x graphics tablet and some graphics software (Photoshop Elements and ArtRage Studio Pro). Best. Decision. Ever.
Now that I have something *fairly* close to a completed page of my prologue, I thought I would post the steps I use to get there. Click on an image to embiggen.
1. First, I write a script in M.S word. I organize it by panel and set apart the text that goes in speech bubbles, etc.

2. Next, I draw out a panel sequence in Photoshop, using the line tool.

3. Still in Photoshop, I add the narration text.
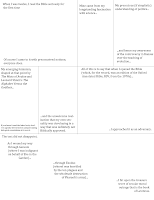
4. I then import the Photoshop file into ArtRage. Here, I start thinking about where in each panel the drawings will go, and I add the speech-bubble text.
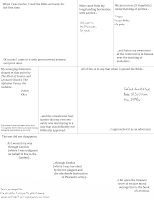
5. I add a new layer, and do rough sketches of each panel using the pencil tool. I do this in blue so I can see where my sketches were when I draw over them in my final medium (pen, in this case).
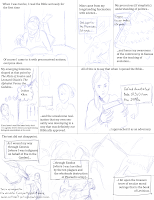
6. Drawing time! I start by going over my sketches in black pen and correcting flaws in my line. This usually involves a lot of scribbling, erasing, and redrawing-- one reason I'm so grateful for how forgiving the tablet is! Then I begin shading. In this case, I'm continuing to use felt pen for this and doing the shading in greyscale. I've always loved comics, a la Edward Gorey, that use lots of tiny, precise cross-hatching to shade, but at this point I have neither the technique nor the patience to do that for more than about two panels.
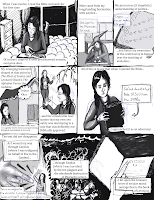
7. Sometimes I will add a watercolor wash for background shading or more dimension. Then, once I'm satisfied with what I have, I'll remove the blue pencil layer. Ta-da! Actually, this page isn't quite done-- the bottom panel, as you can see, needs some more work. But for now I will leave it alone and move on to the next page!
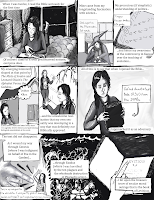
And that's how a comic is made. By me, that is.

No comments:
Post a Comment